Homeowners frequently underestimate the structural complexity of updating their interior spaces. Executing a successful project requires strict adherence to building codes, proper sequence management, and an understanding of plumbing infrastructure. This guide details the practical progression of a full renovation. We focus on the exact sequence of construction required to execute a project safely, ensuring that underlying structures are completely secure before aesthetic finishes are applied. Managing the bathroom renovation process correctly prevents costly rework and protects the structural integrity of your home.
Understanding How to Remodel a Bathroom Step by Step
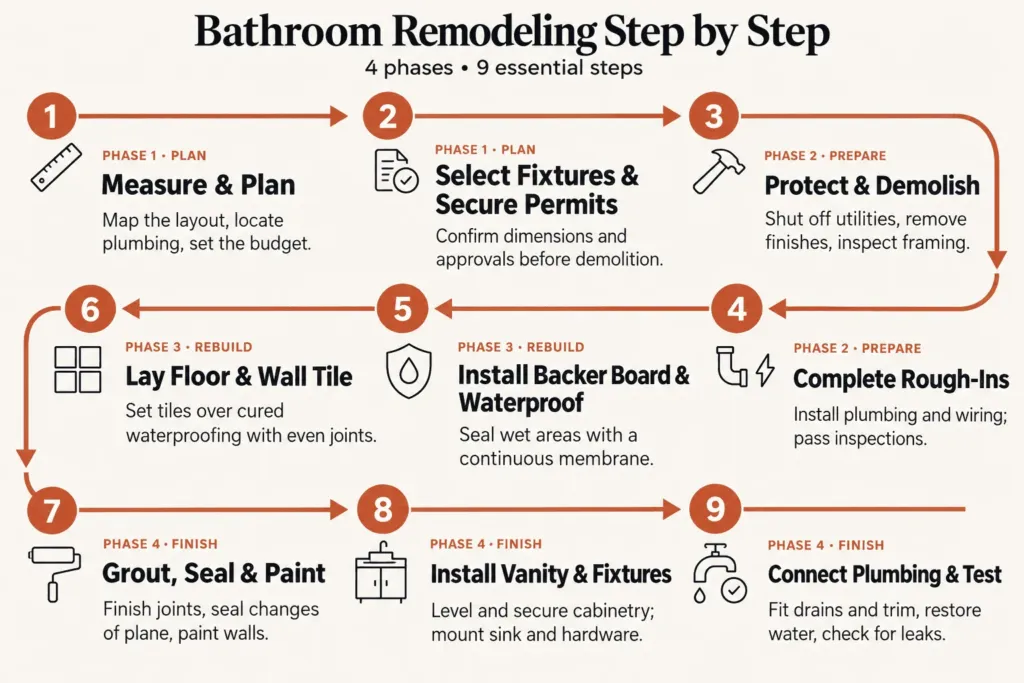
Understanding how to remodel a bathroom step by step requires following a strict construction sequence that prioritizes structural integrity over aesthetic finishes. The workflow begins with layout design, moves through careful demolition, addresses hidden plumbing and electrical systems, establishes a waterproof envelope, and concludes with surface installations.
Deviating from this sequence often results in damaged materials. Sequence errors account for a significant portion of budget overruns in residential construction. Proper sequencing ensures that heavy construction tasks, like moving cast iron pipes or installing electrical conduit, do not damage delicate finishing materials like ceramic tile or glass shower enclosures.
Phase 1: Planning a Bathroom Remodel and Layout
Planning a bathroom remodel and layout requires measuring the existing floor plan, identifying current plumbing stacks, and establishing a detailed material budget before removing any drywall. This preparation phase dictates the timeline and feasibility of the entire construction project. Careful planning prevents unexpected structural conflicts.
During this early stage, homeowners must finalize all fixture dimensions. Selecting a bathtub, vanity, and toilet before opening the walls ensures that the rough plumbing aligns perfectly with the final products. A variation of just one inch in a drain location can force contractors to rebuild an entire section of the floor joist system.
Assessing the Existing Plumbing Structure
Assessing the existing plumbing structure involves locating your main soil stack, hot and cold water supply lines, and ventilation pipes to determine project feasibility. Keeping your toilet and shower drain in their original locations drastically reduces construction time.
Moving underground plumbing requires concrete trenching or extensive subfloor modifications. If your home sits on a concrete slab, relocating a drain line requires cutting through the foundation, which adds significant labor and material costs to the bathroom renovation process. Evaluating these constraints early allows you to design a functional space that works harmoniously with the existing architecture of your house.
Securing Necessary Local Permits
Securing necessary local permits requires submitting your floor plans and electrical schematics to the local building department before starting demolition. Municipalities in Southern California mandate inspections for structural changes. Skipping the permitting phase can result in severe municipal fines. You can read more here about “do I need a permit to remodel my bathroom?”
Local building codes dictate specific requirements for residential spaces. For example, California Title 24 regulations require the installation of high efficiency water fixtures and specific lighting controls. Inspectors will check the framing, the plumbing pressure, and the electrical grounding at various stages. Complying with these regulations ensures your new space is legally recognized and safe for daily use.
Phase 2: The Demolition and Bathroom Renovation Process
The demolition and bathroom renovation process begins with shutting off the main water supply, removing existing fixtures, and taking walls down to the bare studs. This exposes the structural framing and allows contractors to assess any hidden water damage or mold growth behind the old drywall.
A clean, methodical teardown sets the stage for accurate plumbing installations. Removing debris immediately keeps the workspace safe and allows tradespeople to navigate the room efficiently.
Safe Teardown Procedures
Safe teardown procedures require wearing respirators, capping open plumbing lines to prevent sewer gases from escaping, and carefully removing old drywall without cutting into hidden electrical wires. Proper safety protocols protect the rest of the home from hazardous airborne dust.
Workers must also isolate the construction zone using heavy plastic sheeting and negative air pressure machines. Taking time to protect adjacent hardwood floors and HVAC return vents during the early stages of planning a bathroom remodel prevents secondary property damage. Once the room is stripped to the studs, contractors verify that the floor joists are level and structurally sound.
Rough In Plumbing and Electrical Wiring
Rough plumbing and electrical wiring involves installing new pipes, shower valves, and copper wiring while the wall cavities remain completely open and accessible. This critical infrastructure work must pass a municipal inspection before any drywall or cement board is applied to the walls.
Electricians run dedicated circuits for high draw appliances like hair dryers or radiant floor heating systems. Plumbers install the shower mixing valve, ensuring it is set at the precise depth required by the manufacturer. Accurate measurements during this phase are mandatory because adjusting a valve after the tile is installed is nearly impossible without destroying the newly built wall.
Phase 3: Executing How to Remodel a Bathroom Step by Step
Executing how to remodel a bathroom step by step during the rebuilding phase involves hanging moisture resistant backer boards, applying liquid waterproofing membranes in wet areas, and laying tile. This phase transforms the exposed wood framing into a sealed, highly functional, and waterproof room.
Correct moisture management at this stage prevents future structural rot. Water vapor from hot showers can easily penetrate standard building materials. Establishing a continuous waterproof envelope ensures that moisture flows directly into the drain rather than seeping into the subfloor or wall cavities.
Cement Board and Waterproofing Installation
Cement board and waterproofing installation requires securing rigid backer boards to the wall studs and applying a continuous waterproof membrane over all shower walls and floors. Standard drywall degrades rapidly when exposed to moisture and should never be used inside a shower enclosure.
Contractors tape the seams between the cement boards using alkaline resistant mesh tape and thinset mortar. Once the boards are secure, a liquid or sheet waterproofing membrane is applied to create a completely impermeable barrier. A properly waterproofed enclosure is the single most critical element of the entire bathroom renovation process.
Laying Floor and Wall Tile
Laying floor and wall tile requires establishing level reference lines, applying unmodified thinset mortar with a notched trowel, and maintaining consistent grout joints using plastic spacers. Tile must be installed over a completely cured waterproofing layer to ensure lasting adhesion.
The installation begins at the center point of the room or the most visible wall to ensure symmetrical cuts along the perimeter. Proper mortar coverage on the back of each tile prevents cracking under the weight of daily foot traffic. After the mortar cures for twenty four hours, contractors apply grout to seal the joints, followed by a silicone sealant at all directional changes to accommodate natural building expansion.
Phase 4: Finalizing the Bathroom Renovation Process
Finalizing the bathroom renovation process involves grouting the tile, painting the drywall, installing the vanity cabinet, and connecting the finished plumbing fixtures. These finishing touches require meticulous attention to detail to ensure both aesthetic perfection and functional reliability.
This phase requires extreme care to avoid scratching newly installed tiles or chipping fresh paint. Tradespeople wear clean footwear and use protective drop cloths while bringing heavy vanity cabinets and glass shower doors into the finished space.
Installing the Vanity and Fixtures
Installing the vanity and fixtures requires locating the wall studs, securing the cabinet base tightly to the framing, mounting the sink, and attaching the faucet hardware according to the manufacturer specifications. The vanity must sit perfectly level.
If the cabinet is unbalanced, water will pool on one side of the countertop, and the cabinet doors will fail to close properly. Installers use wood shims to correct any minor variations in the floor height. Once the vanity is secure, the countertop is attached using heavy duty construction adhesive, and a bead of silicone is applied along the backsplash to prevent water intrusion.
Connecting Final Plumbing Components
Connecting final plumbing components involves attaching the drain trap to the sink, securing the toilet wax ring to the closet flange, and installing the exterior shower trim kits. Testing all connections for active leaks immediately after installation is a mandatory procedure.
Plumbers slowly turn the main water supply back on and check every joint for moisture. They ensure the toilet flushes correctly and that the hot and cold water supplies are oriented properly at the faucets. Thorough testing at this exact moment in planning a bathroom remodel prevents hidden leaks from causing silent water damage behind the newly finished cabinets.
Frequently Asked Questions About Planning a Bathroom Remodel
How long does the bathroom renovation process take?
The answer to how long the bathroom renovation takes depends on several factors. Usually between three to six weeks for a standard space, assuming all materials are delivered on site before demolition begins. Custom glass manufacturing and municipal inspection scheduling are the two most common factors that extend this timeline.
Can I complete how to remodel a bathroom step by step alone?
You can complete how to remodel a bathroom step by step alone if you possess advanced carpentry, plumbing, and electrical skills, but most municipalities require licensed professionals for trade work. Incorrectly installed plumbing can cause catastrophic water damage and void your homeowners insurance policy.
What order should I install finishes in a bathroom?
You should install finishes from the ceiling down to the floor to prevent gravity from causing damage to newly finished surfaces. Paint the ceiling first, install the wall tile, mount the vanity, place the floor tile, and finish by installing the baseboards and the toilet.
What is the most common mistake when learning how to remodel a bathroom step by step?
The most common mistake when remodeling a bathroom is rushing the waterproofing application before installing tile. Failing to create a continuous moisture barrier behind the cement board inevitably leads to structural rot, mold growth, and a complete, costly teardown within just a few years of daily use.
Should I remove the bathtub during the bathroom renovation process?
You should remove the bathtub during the bathroom renovation process only if your home has at least one other remaining tub, as eliminating all tubs can negatively impact resale value. For primary suites, homeowners frequently replace unused built-in tubs with expansive, curbless walk-in showers that improve daily accessibility and visual space.
Do I need to upgrade my electrical panel when planning a bathroom remodel?
You need to upgrade your electrical panel when planning a bathroom remodel if you are adding high-draw luxury amenities like steam showers, radiant floor heating, or high-velocity hair dryer outlets. A licensed electrician must evaluate your current load capacity to ensure the new circuits comply with current National Electrical Code requirements.