The most expensive bathroom remodel mistakes involve improper shower pan waterproofing, undersized ventilation, and failing to maintain a 15% to 20% budget contingency. These errors regularly lead to structural wood rot, hidden toxic mold, and building code violations, costing homeowners between $4,000 and $18,000 in secondary demolition and repairs.
Avoiding bathroom remodel mistakes requires coordinating five distinct trades within a confined, moisture-heavy footprint: carpentry, plumbing, electrical, tile setting, and mechanical ventilation. When enthusiasm outpaces planning, minor layout oversights quickly become permanent structural headaches.
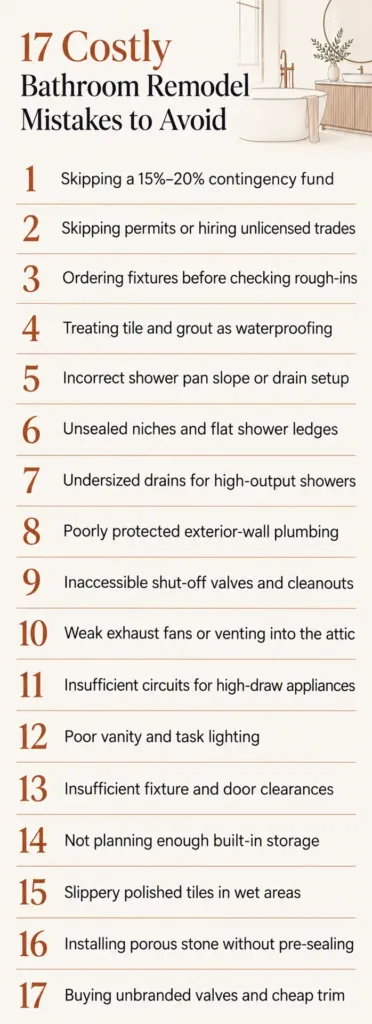
Before tearing out an old vanity or ordering tiles, review this breakdown of the 17 most common bathroom remodel mistakes, the specific building codes governing them, and how licensed trade professionals prevent them.
| Remodel Phase | Highest-Risk Mistake | Code or Trade Benchmark | Estimated Fix Cost |
| Budgeting | Zero reserve for subfloor rot | 15% to 20% contingency | Project delay / $3,000 to $8,000 |
| Waterproofing | Using tile as a water barrier | TCNA B415 / ANSI A118.10 | $6,000 to $18,000+ (Tear-out) |
| Plumbing | Retaining 1.5-inch shower drain | Uniform Plumbing Code (UPC) | $2,500 to $5,000 (Slab trenching) |
| Ventilation | Ducts terminating in attic | IRC Section M1507.2 | $1,500 to $4,500 (Mold removal) |
| Electrical | Shared 15A convenience branch | NFPA NEC 210.11(C)(3) | $800 to $2,200 (Panel wiring) |
| Ergonomics | Toilet centerline under 15 inches | NKBA Planning Guidelines | $1,800 to $4,500 (Moving stack) |
17 costly bathroom remodel mistakes
Planning and Budgeting Oversights That Derail Projects
Bathroom Remodel Mistake 1: Operating Without a 15% to 20% Unforeseen Contingency Reserve
A bathroom remodel budget without a 15% to 20% dedicated contingency fund invites project stalls because moisture-prone wet rooms conceal latent damage behind finished surfaces. Until demolition exposes wall cavities and subflooring, nobody can verify the integrity of plumbing stacks or floor joists.
During demolition, contractors frequently discover galvanized pipes choked with mineral scale, slow drain leaks that have rotted structural framing, or ungrounded wiring junctions left by prior owners. When budgets are stretched to the dollar on high-end finish materials, addressing an unexpected $3,500 subfloor rebuild forces homeowners to compromise on fixtures or halt construction entirely.
The Pro Fix: Lock your budget by allocating 80% to 85% of total capital to planned design, labor, and materials. Place the remaining 15% to 20% in an untouchable reserve fund. If demolition reveals pristine framing and updated plumbing, reallocate that surplus toward upgraded plumbing trim or custom cabinetry at the project’s conclusion.
Bathroom Remodel Mistake 2: Skipping Municipal Permits and Unlicensed Subcontracting
Performing electrical, plumbing, or structural layout changes without municipal building permits risks uninspected safety hazards, insurance denial during water or fire claims, and mandatory teardown orders during real estate sales. Unpermitted work leaves homeowners with no legal recourse when uninspected work fails.
Building codes exist to safeguard life safety and property value. When an unlicensed worker moves a vent stack or wires a wet-area GFCI incorrectly, municipal inspectors will red-tag the property upon discovery. Furthermore, California and most regional jurisdictions mandate formal property disclosure forms upon sale; unpermitted renovations regularly depress appraised value or force sellers to pay thousands for retrospective permits.
The Pro Fix: Insist that your general contractor pulls all required mechanical, electrical, and plumbing permits. Verify active licenses, workers’ compensation insurance, and general liability coverage directly with your state licensing board. Never release final payment until the city building inspector signs off on the final inspection card.
Bathroom Remodel Mistake 3: Ordering Finishes Before Confirming Rough-In Dimensions
Purchasing vanities, freestanding bathtubs, and concealed thermostatic valves before confirming rough-in framing lines leads to restocking fees, installation delays, and awkward clearances. Fixture cut-sheets dictate exact in-wall blocking and pipe centerlines.
A standard vanity with pre-drilled drawer boxes will not close if the waste P-trap exits the wall two inches too low or wide. Similarly, toilet rough-ins vary between 10-inch, 12-inch, and 14-inch dimensions from the finished wall (not the bare framing studs). Ordering a standard 12-inch toilet when your cast-iron waste flange is set at 10 inches stops tile installation cold.
The Pro Fix: Complete on-site framing rough-ins and confirm exact subfloor build-up heights before placing non-refundable orders for cabinetry and specialty fixtures. Provide your plumbing trade with physical manufacturer specification sheets for all valves, sinks, and tubs before walls are closed.
Water Management and Waterproofing Disasters
Bathroom Remodel Mistake 4: Relying on Tile and Grout as a Waterproofing Barrier
Tile and cementitious grout are aesthetic, wear-resistant surface coverings, not waterproof barriers. Water passes directly through microscopic grout pores and hairline cracks; without a continuous, impervious membrane behind the tile, water continuously saturates backer boards, rotting wall studs and promoting toxic black mold.
A traditional cement backer board (such as Durock or WonderBoard) is moisture-stable (meaning it will not disintegrate when wet), but it is completely porous. Water penetrates the grout, passes through the board, and enters the wood stud cavity. Under the TCNA Handbook (Tile Council of North America), showers require an approved ANSI A118.10 waterproofing barrier applied over or under the substrate.
The Pro Fix: Install a continuous, bonded sheet membrane (such as Schluter-Kerdi) or an elastomeric liquid-applied membrane (such as Custom Building Products RedGard or Laticrete Hydro Ban) directly over approved backer boards. Ensure every screw penetration, corner seam, and pipe protrusion is sealed with waterproofing tape and manufacturer-specified sealant before a single tile is set.
Bathroom Remodel Mistake 5: Improper Shower Pan Pre-Slope and Drain Clamping Failures
Installing a shower pan liner directly on a flat subfloor without a sloped mortar bed underneath traps standing water beneath the tile floor, creating foul sewer-gas smells, efflorescence, and eventual wood rot. Water must be actively channeled to the drain weep holes beneath the tile.
In traditional three-piece clamping drain systems, water that seeps through the tile and mud bed collects on top of the waterproof liner. If the liner rests on a flat subfloor, that moisture sits stagnant, turning the mud bed into an underground swamp that breeds bacteria. If the plumber inadvertently blocks the drain body’s weep holes with mortar, that trapped water eventually migrates outward past the shower curb.
The Pro Fix: Adhere strictly to International Residential Code (IRC) Section P2708.1 by ensuring a pre-pitch mortar bed of 1/4-inch per linear foot sloping from the shower perimeter toward the drain before installing the liner. Place pea gravel around the clamping drain weep holes to keep them clear of mortar, and conduct a mandatory 24-hour standing water flood test (filling the pan to the curb top) to certify watertightness before tiling.
Bathroom Remodel Mistake 6: Unsealed Shower Niches and Flat Shelf Ledges
Building recessed shower niches with level or inward-sloping sills causes water to pool permanently along interior grout joints, degrading sealant and leaking into wall cavities. Shower niches are the most common failure point in modern custom showers.
Framing a shower niche requires puncturing multiple wall studs, creating seams in direct spray zones. When contractors assemble shelves using separate tile cuts and flat cement mortar, standing water pools in the back corners. Over months of daily use, soapy water dissolves cement grout, seeps past raw drywall edges, and causes structural rot in adjoining rooms.
The Pro Fix: Use a one-piece, factory-molded waterproof niche made from high-density expanded polystyrene or polyurethane. When setting the bottom sill, choose a single solid piece of quartz or polished stone rather than grouted tiles, and pitch the sill 1/8-inch toward the shower drain so water sheds automatically.
Plumbing and Mechanical Blind Spots
Bathroom Remodel Mistake 7: Failing to Upsize Drain Lines for High-Output Showers
Connecting a multi-head custom shower system to a legacy 1.5-inch bathtub drain line causes immediate pan flooding and curb overflows because high-flow fixtures discharge water faster than narrow gravity lines can evacuate it.
Bathtubs historically utilized 1.5-inch waste lines because the tub basin held water while draining slowly. Modern walk-in showers, particularly those equipped with rainfall heads, wall sprays, and handheld wands flowing at 4 to 6 gallons per minute (GPM), demand an expanded 2-inch drain pipe under the Uniform Plumbing Code. A 2-inch pipe provides more than double the cross-sectional drainage capacity of a 1.5-inch pipe.
The Pro Fix: Cut back the concrete slab or subfloor framing during the rough-in stage to replace all 1.5-inch shower waste lines with 2-inch DWV (drain-waste-vent) pipes. Pair high-volume shower systems with EPA WaterCSense certified low-flow showerheads (1.75 to 2.0 GPM) to prevent drainage overloads and lower water heating utility bills.
Bathroom Remodel Mistake 8: Ignoring Pipe Freezing and Exterior Wall Plumbing Placements
Running water supply lines inside exterior-facing wall cavities without adequate insulation risks catastrophic pipe bursts during sudden cold snaps and causes chronic water temperature fluctuations.
Exterior walls contain minimal insulation depth when 2×4 framing studs are occupied by 1/2-inch copper or PEX tubing. During winter months, cold bridging through exterior siding drops the air temperature inside the wall cavity below freezing. Even in temperate climates, supply lines run against exterior sheathing lose thermal efficiency, forcing water heaters to work harder to maintain hot water temperatures at the fixture.
The Pro Fix: Route all water supply lines through interior partition walls whenever possible. If layout constraints require placing a shower or vanity on an exterior wall, build a false interior 2×4 plumbing chase wall (furring wall) inside the primary structural wall, allowing full, uninterrupted fiberglass or closed-cell spray foam insulation behind the pipes.
Bathroom Remodel Mistake 9: Omitting Readily Accessible Shut-Off Valves and Cleanouts
Burying plumbing shut-off valves or main cleanouts behind tiled surfaces without accessible service panels turns routine cartridge replacements or drain snaking into expensive demolition projects.
Plumbing fixtures contain mechanical components that wear out: thermostatic balancing cartridges fail, diverter valves degrade from mineral scale, and tub motor pumps require servicing. When these parts are tiled in permanently, replacing a $60 cartridge requires a plumber to smash through expensive custom tilework to access the valve body.
The Pro Fix: Install quarter-turn ball shut-off valves inside adjacent closets, vanity cabinet walls, or install magnetic, flush-mount paintable access panels. For jetted or hydrotherapy tubs, the building code mandates a minimum 12×12-inch accessible opening directly adjacent to the pump motor.
Electrical and Ventilation Code Errors
Bathroom Remodel Mistake 10: Undersizing the Exhaust Fan or Venting Directly into the Attic
Installing a weak exhaust fan or venting its discharge duct directly into an attic space forces warm, humid air into wood structural rafters, rapidly growing black mold colonies and rotting the roof sheathing.
A small, buzzing 50 CFM fan cannot evacuate the vapor cloud produced by an extended hot shower. If that humid air is pumped into an unconditioned attic, the moisture condenses on cold plywood roof decks, fostering toxic fungal growth that spreads into living areas through ceiling penetrations.
The Pro Fix: Size your fan according to NKBA and Home Ventilating Institute guidelines: provide at least 1 CFM per square foot of bathroom area for rooms up to 100 square feet, and add 50 CFM for each jetted tub or enclosed toilet compartment. Under IRC Section M1507.2, exhaust fans must vent directly outdoors via insulated, rigid metal ductwork terminated with a backdraft damper on an exterior wall or roof cap. Wire the fan to an automatic condensation-sensing humidity wall switch.
Bathroom Remodel Mistake 11: Insufficient Dedicated Circuitry for High-Draw Appliances
Tying bathroom convenience outlets into a shared 15-amp lighting or bedroom circuit causes frequent breaker trips whenever high-draw styling tools, towel warmers, and exhaust fan heaters operate at the same time.
A standard hair dryer or curling iron draws 1,500 to 1,800 watts, consuming 12.5 to 15 amps of current on its own. When combined with radiant floor heating or overhead lighting on an outdated 15-amp branch circuit, electrical overloads trip circuit breakers instantly and create hidden fire risks in aging wiring splices.
The Pro Fix: Adhere strictly to National Electrical Code (NEC) Section 210.11(C)(3) by running a dedicated 20-amp branch circuit serving only bathroom receptacle outlets. If your renovation includes electric radiant floor heating mats or a high-wattage steam generator, provide separate dedicated circuits back to the main electrical panel. Ensure every countertop outlet is equipped with Class A GFCI protection located within 36 inches of the sink basin.
Bathroom Remodel Mistake 12: Inadequate Task and Vanity Lighting Layouts
Placing a single recessed downlight directly above the vanity mirror casts unflattering, dark shadows under the eyes, nose, and chin, making shaving, makeup application, and personal grooming difficult.
Can lights positioned directly overhead illuminate the top of the head while throwing the face into shadow. Furthermore, omitting dedicated wet-rated task lighting inside an enclosed walk-in shower leaves the bathing enclosure dark and visually cavernous.
The Pro Fix: Design a three-tier lighting scheme. Mount vertical wall sconces at eye level (roughly 60 to 65 inches above the finished floor, spaced 28 to 36 inches apart) on either side of the mirror to project balanced, cross-illuminating task light across the face. Complement task lighting with dimmable, high-CRI (90+) recessed ceiling fixtures for ambient light, and install an IP65 wet-rated recessed downlight inside the shower stall.
Ergonomics, Clearances, and Space-Planning Regrets
Bathroom Remodel Mistake 13: Encroaching on Standard Fixture Clearance Zones
Ignoring minimum building code clearances traps vanity drawers against shower glass doors and leaves homeowners bumping their knees against walls while seated on the toilet.
A beautiful freestanding tub or double vanity is useless if opening the bathroom door blocks access to the shower. Squeezing a toilet into a tight 26-inch alcove violates health codes and creates an unlivable space for daily use.
The Pro Fix: Enforce mandatory IRC spatial clearances:
- Provide a minimum of 15 inches from the centerline of the toilet to any side wall, vanity, or obstruction (18 inches is strongly recommended for comfort).
- Maintain at least 21 inches of clear walkway space in front of the toilet, vanity, and shower entry (30 inches is recommended).
- Verify that glass shower doors, vanity cabinet drawers, and entry doors clear one another with at least 2 inches of margin throughout their full swing paths.
Bathroom Remodel Mistake 14: Overlooking Integrated Vanity and Recessed Storage
Prioritizing minimalist, floating open-shelf vanities without planning closed cabinetry or recessed medicine cabinets leaves daily toiletries, hairdryers, and cleaning products permanently cluttering countertops.
Open-shelf vanities look stunning in designer catalog photos, but real life requires storing toilet paper, prescription medications, electric toothbrushes, and cleaning chemicals. When a vanity lacks deep drawer boxes or under-sink space due to plumbing traps, clutter accumulates across every horizontal surface.
The Pro Fix: Maximize vertical stud bays by framing flush-recessed, mirrored medicine cabinets equipped with internal electrical outlets. Specify vanity cabinetry with custom U-shaped drawers engineered to wrap around the plumbing P-trap, and frame shallow storage towers or recessed wall niches above the toilet. (Read more: How to install an over the toilet cabinet)
Material Selection and Finish Failures
Bathroom Remodel Mistake 15: Installing Slippery, Highly Polished Floor Tiles in Wet Areas
Laying large-format, polished porcelain or slick natural marble on a shower floor creates an extreme slip hazard when the surface is wet and coated with soap residue.
Polished stone slabs have near-zero surface traction when wet. Large-format tiles (e.g., 12×24-inch or 24×48-inch tiles) also make it impossible to slope a standard shower floor evenly toward a center drain without executing awkward, unsightly diagonal cuts across the face of the tile.
The Pro Fix: Choose floor tiles with a certified Dynamic Coefficient of Friction (DCOF) rating of 0.42 or greater under the ANSI A326.3 standard (a rating of 0.55+ is recommended for wet areas). For traditional center-drain shower pans, select 2×2-inch mosaic tiles; the frequent grout lines naturally act as slip-resistant traction grids. If you prefer large-format floor tiles in the shower, install a single-slope curbless floor directed toward a sleek linear drain.
Bathroom Remodel Mistake 16: Using High-Maintenance Porous Stone Without Pre-Sealing
Installing unsealed natural Carrara marble, travertine, or limestone in high-humidity zones leads to yellowing rust stains, mineral etching from cosmetic cleansers, and water discoloration.
Natural calcium carbonate stones are chemically reactive and highly porous. Acidic bathroom cleaners, shampoos, and shaving creams cause chemical etching (dull spots) on polished marble within seconds. Furthermore, natural marble contains trace iron deposits; when water continuously saturates an unsealed tile from behind, the iron oxidizes, turning pristine white marble into blotchy yellow-brown stone.
The Pro Fix: If natural marble is non-negotiable, pre-seal all tile faces and edges with a premium penetrating, solvent-based fluoropolymer impregnating sealer prior to installation, and reapply annually. Alternatively, select high-definition, non-porous glazed porcelain slabs that replicate natural marble veining without moisture absorption or sealing requirements.
Bathroom Remodel Mistake 17: Purchasing Unbranded Plumbing Valves and Cheap Trim Kits
Buying bargain, unbranded shower valves and faucets online to shave a few hundred dollars off the budget frequently results in leaking cartridges, poor temperature balancing, and an inability to source replacement parts when internal components fail.
A plumbing rough-in valve is permanently soldered inside the wall behind expensive tile and waterproofing membranes. Generic imported valves rarely carry ASME A112.18.1 or CSA B125.1 certifications. When the plastic internal cartridge cracks two years later, homeowners discover the manufacturer has disappeared, forcing them to break through the tile wall to replace the entire valve body.
The Pro Fix: Standardize on commercial-grade, pressure-balancing or thermostatic rough-in valves from established plumbing manufacturers. These companies maintain standardized cartridge lines, offer lifetime mechanical warranties, and guarantee replacement component availability for decades.
Pre-Construction Prevention Checklist
- Permits & Design: Architectural layout drawn to scale; trade permits secured; 15% to 20% budget contingency locked.
- Demolition & Framing: Subfloor joists inspected for rot and deflection; toilet centerline confirmed at 15 to 18 inches; wall blocking installed for grab bars and heavy floating vanities.
- Plumbing Rough-In: Shower drain line upsized to 2 inches; supply lines kept out of exterior walls; pressure-balanced valves installed from major manufacturers.
- Electrical & Mechanical: Dedicated 20-amp GFCI branch run to vanity; exhaust fan ducted outside with minimum 1 CFM per square foot; eye-level vertical task lighting framed.
- Waterproofing Certification: Pre-slope mortar bed pitched 1/4-inch per foot; continuous bonded sheet or liquid membrane applied; uninterrupted 24-hour water flood test completed and signed off.
- Tile & Finishes: Floor tiles verified at minimum 0.42 DCOF; natural stone pre-sealed; 21 to 30 inches of clear floor clearance verified across all fixture pathways.
FAQs About Bathroom Remodel Mistakes
What is the single most expensive bathroom remodeling mistake?
The most expensive mistake is failing to properly waterproof the shower pan and wet-area walls. Water entering wall cavities rots structural framing studs, destroys subflooring, and breeds toxic mold. Repairing this error requires a full structural tear-out of all surrounding tile, waterproofing, and framing, typically costing between $6,000 and $18,000.
Can I replace an old bathtub with a walk-in shower without changing the plumbing?
Replacing a bathtub with a walk-in shower requires changing the drain diameter. Bathtubs use a 1.5-inch drain pipe, whereas building codes mandate a 2-inch drain pipe for walk-in showers to prevent basin pooling and overflow flooding. You must also evaluate the valve height and relocate water supply lines.
How much contingency buffer should I realistically budget for a bathroom remodel?
You should maintain a dedicated 15% to 20% contingency fund above your estimated material and labor costs. Older homes frequently hide cast iron pipe corrosion, rotted subfloors from old toilet wax ring leaks, and outdated electrical circuits that cannot be discovered until demolition is complete.
Do I need a building permit to remodel my existing bathroom?
Yes, you need a building permit if your renovation alters plumbing supply or waste lines, adds or moves electrical circuits, modifies load-bearing framing, or expands the bathroom footprint. Cosmetic updates like swapping an identical-sized vanity or replacing surface floor tiles typically do not require permits, but wet-area renovations almost always do.
Planning a primary bathroom renovation in Laguna Hills and Orange County? Contact Kitchen Art & Bath at (949) 393-5640 to discuss your floor plan with our licensed design-build team.